Thursday, May 31, 2012

The Good, The Bad & The Not So Pretty

I received a few stamps from the lovely Lisa Carroll and decided I needed to ink them up right away (the good).

Before I went to bed I had inked up a lace stamp with Hero Arts Iris Chalk Ink on a piece of purple vellum and when I came back to it in the morning the image had bled and distorted and gave me a weird looking background with no lace image visible (the bad).

Here it is on the card.


Well I decided to use that background anyway and embossed Hero Arts Lattice image ontop of the bad looking background and I kind of like how it turned out (the good).

But then I took pictures of my card and I couldn't get the colours to be true. Do you ever make a card that just not photograph well? I get a few of those every year and todays card is one of those (the not so pretty).

The purple is a little too vivid and the felt flower is not that bright, it's actually the same colour as the lace.

But I didn't let any of these things stop me from posting my card.  That 's just the way things are sometimes...

So I'm submitting this card for the Moxie Fab Doilies & Lace Challenge and the Simon Says Anything Goes Challenge.

And that is my tale of The Good, The Bad & The Not So Pretty!

Thanks for stopping by!


Monday, May 28, 2012

Moxie Fab

I made a card for the Moxie Fab Damask & Brocade Challenge. I like using damask stamps for wedding or anniversary card, they are always so elegant.
For this card I decided to flock the brocade image to add some texture and the top half of the card was double embossed in my Vagabond with a Papertrey Ink Impression Plate and Die. The dark chocolate paper has a slight gold metallic hue to it so I embossed the sentiment with gold embossing powder and I finished off with some ribbon and pearls.

Thanks for stopping by!


Sunday, May 27, 2012

Happy Sunday!

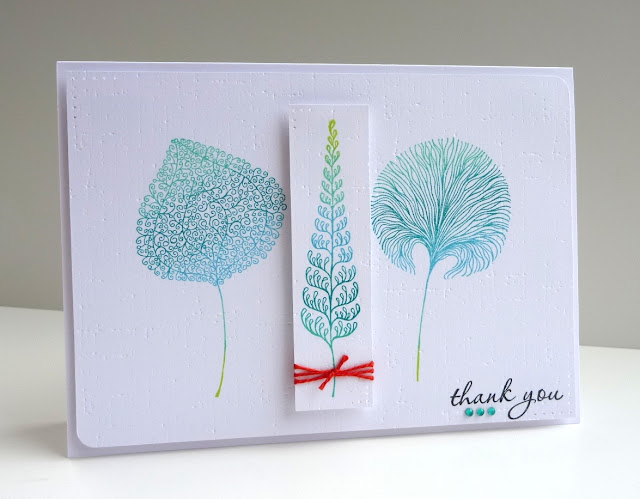
I had a chance to play with some stamps today, just getting inky for fun.
I really like these leaf stamps from Impression Obsession and haven't had a chance to use them very much so I inked them up with a Kaleidacolor ink pad and stamped away. There are such pretty blues and greens in the Caribbean Sea ink pad.  I just did a little embossing and paper piercing on the card and added a touch of red!

Enjoy the rest of your weekend everyone!

Supplies:
Stamps: Impression Obsession (Fronds), Papertrey Ink (Communique Sentiments)
Paper: Papertrey Ink (Stamper's Select White)
Ink: Kaleidacolor Caribbean Sea, Versafine Onxy Black
Other: Papertrey Ink Linen Impression Plate, Red Embroidery Thread, EK Success Corner Rounder, Tim Holtz Vagabond

Thursday, May 24, 2012

Masculine Marquee

Todays card is another interactive one from Ellen Hutson's Hownow School.

A fun little masculine gate fold card that opens like this

to this

and reveals a hidden stamped image. I just love the cards that Julie taught us to make in this class!

I'm entering this at A Blog Named Hero's Dust Em Off Challenge.

My least used stamp in the project is the birthday cake. I've used the sentiments from the stamp set is belongs to but I don't think I've ever used the cake stamp, if I have it was eons ago.

I'm also entering this for the Simon Says Father's Day/Special Male Challenge. I never seem to make as many cards for the guys as for the gals, why is that?

Wishing you an inky day!

Supplies:
Stamps: Hero Arts (Raindrop Background, Birthday Messages, Designer Woodgrain, Birthday Frame & Messages)
Paper: Neenah Solar White, DCWV, Bazzill, Ranger Black Glossy Cardstock
Inks: Memento Tuxedo Black, Versamark, Versafine Onyx Black Colorbox Chalk Ink in Gray Whale, PTI Smokey Shadow
Other: Hero Arts Digital Kit Sea Patterned Papers, EK Success 1 3/4" Circle Punch, Spellbinders Standard Circle Large Dies, Provo Craft Olivia Alphabet Dies, Ranger Black Embossing Powder, Memento Marker in Lady Bug, Sakura Glaze Pen in Clear, Sakura Stardust Pens in Sky Star, Copper Star & Red Star, Copic Markers C-1 & C-3, Scotch ATG Gun, Martha Stewart Score Board, Tim Holtz Vagabond, Xyron Creative Station


Thursday, May 17, 2012

Shadow Box Card

I really had fun making my next card for the FIPIFIZI class (link at sidebar).  It's a shadow box card that can be folded flat and mailed in a standard A2 envelope.
Supplies: Cornish Heritage Farms Weathered Wood Background Stamp, Jenni Bowlin Cough Syrup Ink, Memory Box Dies (Modern Landscape, Puffy Clouds), Spirelli Punch, Paper (Neenah Solar White, American Crafts Cardstock), Hero Arts Birds & Patterns Digital Kit, Twinery Twine

I made a little scene using a punch and a couple of dies from Memory Box.  Can you tell what I used to make the Modern Landscape Border?
It's packaging from Memento Ink Pads! These multi-coloured tear drops make me smile so I kept the packaging and thought I might be able to use it on a project one day, well today was that day.

It's hard to tell in the photo but all the elements are at different heights so it adds a lot of dimension to the card.  Here's a side shot of the card depth.

 Thanks for stopping by and visiting, I truly appreciate all your comments!

Wednesday, May 16, 2012

Buckle Card

Just doing a quick post showing the buckle card I made for the FIPIFIZI class (there's a link in my side bar).
Supplies: Hero Arts Stamps (Feather Grass, Antique Engravings), Inks (Distress Peacock Feathers, Tsukineko Brilliance Sunflower Yellow, Versafine Onyx Black), Paper (Neenah Solar White), Stampin' Up Square Lattice Embossing Folder, Perfect Pearls

I love this colour combo of bright yellow with the new Tim Holtz Distress Ink, Peacock Feathers. I made a spray out of the reinker and misted white cardstock then finished off with a spritz or two of Perfect Pearls. While the paper was still damp I stamped the Feather Grass with Peacock Feathers so it would bleed a bit and give a water colour effect.

It's hard to photograph the "buckle" part of this card but it involves the butterfly. If you want to know the secret of how to make this card you can still register for the class at Ellen Hutson.

I'm also entering this in the Simon Says Clean & Simple Challenge.


Have a great day!


Thursday, May 10, 2012

Interactive Birthday

Here's another card from FIPIFIZI class, you can still register for it here.
This is what the card looks like when taken right out of the envelope....and then


When you open the front flap a hidden section is revealed.

I had such fun making this card with the little monsters. They are from a Hero Arts digi kit found here. I used a combination of traditional stamping and some digi elements on this card.

Thanks for stopping by!

Supplies:
Stamps: Hero Arts (CG440 Tartan Background, S5027 Design Block Birthday, CL498 Celebrate Everyday, Cl139 Birthday Messages)
Digital Kits: Hero Arts (Monster Party, Blush Patterned Papers, Foliage Patterned Papers, Silly Scape)
Paper: Hero Arts Powder Layering Paper, Neenah Solar White
Other: Hero Arts White Embossing Powder, Versamark, Memento Lady Bug Ink, Googly Eyes, Twinery Twine, Sakura Stardust Pens


Wednesday, May 9, 2012

Fold It, Pop It, Flip It, Zip It

That's the title of an interactive card class being taught by Julie Ebersole at Ellen Hutson's How Now School of Creative Arts. You can still register for the class and participate in all the lessons!
This card sits on a raised base that will fold nice and flat and fit into an A2 size envelope.
How fun for the recipient to pop open the card to reveal the surprise!

Wishing you an inky day!

Supplies:
Stamps: Hero Arts (CG130 Butterflies, CL139 Birthday Messages, CG170 Wildflower Garden, S5208 Designer Woodgrain)
Paper: Hero Arts (Foliage Designer Paper, Grass & Latte Layering Paper), Canson Watercolor Paper
Inks: Versafine Onxy Black, Hero Arts Chalk Ink in Latte
Other: Memento Markers (Lady Bug, Lilac Posie, Rosebud, Cantaloupe, Dandelion, Tangelo, Rhubarb Stalk, Grape Jelly), Marvy Marker (Light Green), Twinery Twine

Monday, May 7, 2012

Stencil Flower & Video

I love this big Stencil Flower from Hero Arts, it's a great stamp to use with Distress Inks.

Stamps all Hero Arts: Stencil Flower, Classic Fabric Design, Year Round Sentiments
Ink: Hero Arts (Soft Shadow Ink in Soft Purple), Distress Inks (Tumbled Glass, Seedless Preserves, Embossing Ink), Colorbox Chalk Ink (Blackbird) 
Paper: Neenah Solar White, Canson Watercolour 140lb, Vellum
Basic Grey Button

I love applying lots of Distress Ink directly onto the embossed flower and spraying heavily with Perfect Pearls so the colours move around on the paper. This really only works on watercolour paper, other papers will disintegrate or pill from the wetness.

Here's a video on how I made this card.


I'm entering this card at the Simon Says Stamp Birthday Challenge.

And as a side note I would like to wish my hubby a Happy Anniversary, it's our 24th today!

Thanks for stopping by!

Friday, May 4, 2012

Butterfly Gift Card Holder & Video

This project was inspired by a gift card holder that I received at Christmas. Here's my card.
Supplies: All supplies Hero Arts unless otherwise noted. CG442 Floral Vine Background, CG 335 Dot Flower Background, CG281 Today & Always, CL277 Birthday Frame & Messages, CL383 Antique Engravings, Celadon & Carnation Layering Paper, Soft Shadow Ink in Soft Green and Soft Blossom, Versafine Onxy Black, White Pearls, Spellbinders Grand Wonderful Wings

The butterflies slide apart to reveal the gift card inside.
I stamped a sentiment on the left panel and the right panel can be used to write a personal message.

Here's my video to show you how I created this project.  Please bear with me, I had some technical difficulties....


The finished size of this card is 5.5" x 3.5". For the card base cut a piece of cardstock to 3.5" x 11" and score 2.75" in from each end. This will give you a gate-fold card.

For the slits needed to hold the gift card I measured 0.75" up from the bottom of the card and measured in 1.5" from each score line/fold and made a little mark. This is where your cut will start and go straight up for a length of 1.25". At the top of this slit make another cut that is 0.75" long and is angled at about 45 degrees towards the score line.

To cut out the butterflies I used a Spellbinders die and cut a slit in the centre (or body) of the butterfly. On one butterfly the slit goes from the bottom to the centre and on the other butterfly it goes from the top to the centre. My cuts are between. 3/8"-1/2" in length. This number will vary on the size of the butterfly you use for your card. It's best to practice on some scrap paper to see what length of slit is needed for your particular butterflies to slide and overlap each other.

My next goal is to experiment with different focal shapes and see if this technique will work on something other than a butterfly.

I'm entering this in the Simon Says Stamp Challenge 3rd Birthday Celebration. Check it out here.

And I'm entering this in the CAS-ual Fridays Birthday Challenge here.


Thanks for stopping by!